

It’s been a somewhat frustrating process. But also a satisfying one in some aspects.
I went home to see my mom and took her to JoAnn’s and Home Depot. I had her pick a fabric for the cushion at JoAnn’s and paint colors at Home Depot. I did a mock up of the model with the colors and most of the time the colors looked very “easter” as my classmates called it. I’ve gone through a few color options and think I found one that it pretty good and less “easter”. My partner says correct is the one thing he does care about at all so that’s up to me.

We attempted to cut our first 1/3 scale model of our chair on the laser cutter. We used 1/4 inch plywood I got from JoAnn’s, but for some reason it wouldn’t cut all the way through. We did multiple passes and nothing was going all the way. One of our boards got moved somewhere between passes and my partner just ripped the extra bits off doing damage to the actual model. The edges are also burned, which they won’t be on the CNC, so that’s something to think about with the model too.
I put the model together, but the whole thing ended up being very wobbly. (see pictures)

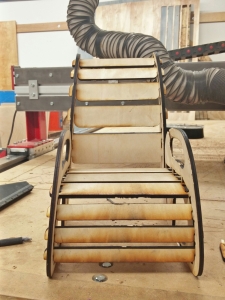


Since I was frustrated with the model I went home and did a lot of work on it all day Friday. I completely redrew and reset up the model. My thought was that because the sides were at an angle and the holes were not that there was too much play between the sides and the slats and it was causing the whole thing to not fit tightly. So when I was redrawing the model I made the sides vertical again. I also made the slats into more uniform sizes so that the holes in the side would be more aesthetically pleasing. (after putting it together I see that I need to move one of the back slats up so that the spacing is more uniform) I also made the point where the joints for the slats more centered so that the weight distribution would be more even causing the chair to be more stable and sturdy. I also worked on how the piece would be colored so that it looked less easter.


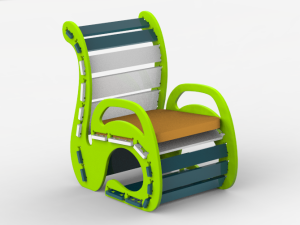

I got new plywood from Home Depot that had a balsa wood core in the hopes that it would be easier to cut on the laser cutter. I also set up the new cut file so that there were no over lapping lines and the cut would be cleaner and use less material. Luckily this time it cut on the first pass. I was so happy. When I put the new chair together it was more stable and had a more sturdy feel which is what I wanted.


I still need to do some work on the tolerances, but it is definitely coming along. I don’t think the sides at an angle are going to work. And I have gotten most of the painting of the model done, I just have to do the edges of the sides in the pink.

I couldn’t refrain from commenting. Perfectly written!
LikeLike
Thank you.
LikeLike
Howdy, i read your blog from time to time and i own a similar
one and i was just wondering if you get a lot of spam
remarks? If so how do you reduce it, any plugin or anything
you can recommend? I get so much lately it’s driving me insane so any assistance is very much appreciated.
LikeLike
I don’t actually get many comments on my posts, so I don’t really have advice for you. Sorry. 😦
LikeLike